
DIY BACKYARD POND & LANDSCAPE WATER FEATURE
This is a project I have wanted to do for several years and this past summer, I decided it was going to get done. Most of my delay over the years in completing this project was the cost. As I suspected, when I got a few estimates, they ranged from $4,000 to $5,000. Of course, this stopped me in my tracks…to say the least I was highly disappointed. My husband was pushing me towards a pre-fab fountain…not my vision!
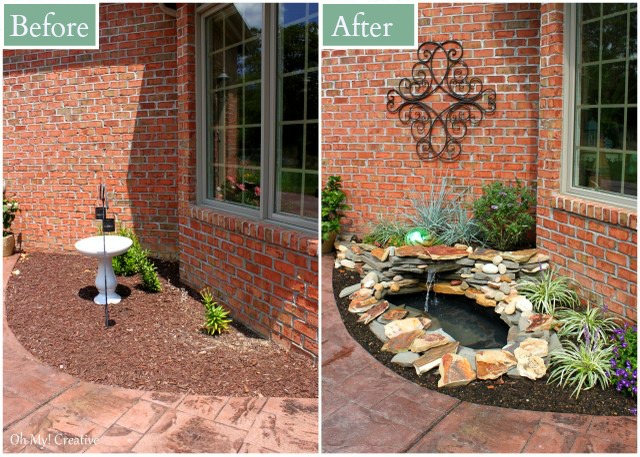
You can see, in the before photo, the small area that needed attention was surrounded by a walkway and patio. Each summer I would plant annuals and place a bench there to make it look nice, but never did any permanent landscaping to the bed…because I had a vision!

I was determined to not give up on “my vision” of a water feature, so I began to do a little research online to see how to build my own. I felt a little unsure about being able to complete this project on my own until I found a book in my basement…yes, I already owned it…who knew! Paging through the book I found a perfect example of how to build this simple pond with a waterfall. It included all the step by step photos and supplies that I would need. The book is from Sunset – Garden Pools, Fountains & Waterfalls. It made me feel more confident to have a visual source to help get through the project.
I bought all my pond supplies at Lowe’s. Unsure about what I needed I bought extras of many things, so that when I was in the construction process, I wouldn’t have to run out and buy something different. I returned all unopened items.

Since my space was small, I bought the 50 gallon plastic form. Now I know a professional would not have used a plastic form, but would have created a custom plastic lined pond. I was afraid of that leaking over time and went for the form. Along with the pond I wanted to create a small waterfall with a stone wall. The brick wall, on this side of the house, bakes in the afternoon sun. I have tried to plant tall flowering annuals there and they just can’t take the afternoon sun. So, I decided to create a small stone wall to add a little elevation and add a few plants and grasses there that can take the heat. Using the wall, I incorporated the waterfall.
Getting started…
We marked the shape of the pond and a rough area for the wall with spray paint. Then began to dig.

Once the hole was dug, we tested it to make sure it was fitting properly. We did this several times. Once we were happy with the fit, we placed sand in the bottom to help level it and to fill any of the gaps between the soil and the form. We also made sure the pond was completely level.

Getting the stone was interesting. The landscape supplier had beautiful pallets of stone but was much more stone than I needed. They were willing to let us climb their remnant stone pile and pick what we wanted. So on a 95 degree day, my daughter and I loaded up the mini van and for $26 this is how much stone we picked out! Did I mention it was 95 degrees…we were dying. Once we got it home, we had to unload it and haul it all to the back of the house. It was a bit unbearable! After placing the stone, I realized I needed at least double the amount I brought home. Instead of climbing for more stone, I found a watergarden shop that sold small pallets. Once again, I filled my mini van with the stone and brought it home!


Truth is, I built the mini wall three times with much frustration. I had to place the pump and tubing first before I could build the wall as the tubing had to come up behind the wall. The problem I ran into was that when the water spouted out and down the stone it also drained behind the wall. I didn’t want to be pumping the water for the waterfall and having it draining into the soil behind…this drove me a little crazy! By moving the tubing around and using other small stones to divert the flow of the water away from the wall, I got it down to a minimum. As a precaution, I placed a piece of pond plastic from the edge of the tub and brought it up the back of the stone, so the water could not drain. Then I backfilled with soil.

The final step was to visit a few garden centers for the right type of plants. As I said, this area gets full sun during the day. I went with a few types of grasses…some flowering and a butterfly bush. I was so pleased with the end result and proud of myself for completing my own backyard pond! See below for my cost breakdown.
Stone $117.00
Pond Supplies $190.00
Plants $134.50
Total $441.50
Now that’s a savings!
Article Source: DIY BACKYARD POND